This document outlines the design, component selection, and construction of a cost-effective, portable, and rechargeable Bluetooth speaker. The project integrates several common electronics modules to create a standalone audio device. The system streams audio wirelessly from a Bluetooth source (like a smartphone), amplifies the signal using a PAM8403 stereo amplifier, and provides power from a rechargeable 18650 Lithium-ion battery. The circuit also includes a TP4056 charging module, allowing the battery to be recharged via a standard Micro-USB connection. This project serves as a practical introduction to audio electronics, power management, and system integration, resulting in a functional prototype that, while modest in appearance, is fully operational.
A Custom DIY Rechargeable Bluetooth Speaker
Abstract
Components
| Component | Quantity | Description |
|---|---|---|
| Speaker Driver | 1 | A 0.5W, 8-ohm speaker. |
| Audio Amplifier | 1 | PAM8403 3W+3W stereo Class-D amplifier module. |
| Bluetooth Module | 1 | CA-6953 Bluetooth audio receiver module. |
| Charging Module | 1 | TP4056 Micro-USB 1A Li-ion battery charging board. |
| Battery | 1 | 18650-type 3.7V Lithium-ion rechargeable battery. |
| Battery Holder | 1 | (Optional, but recommended) A single 18650 battery holder. |
| Switch | 1 | A simple SPST (Single Pole, Single Throw) slide or toggle switch. |
| Connecting Wires | As needed | 22-26 AWG solid-core or stranded wire. |
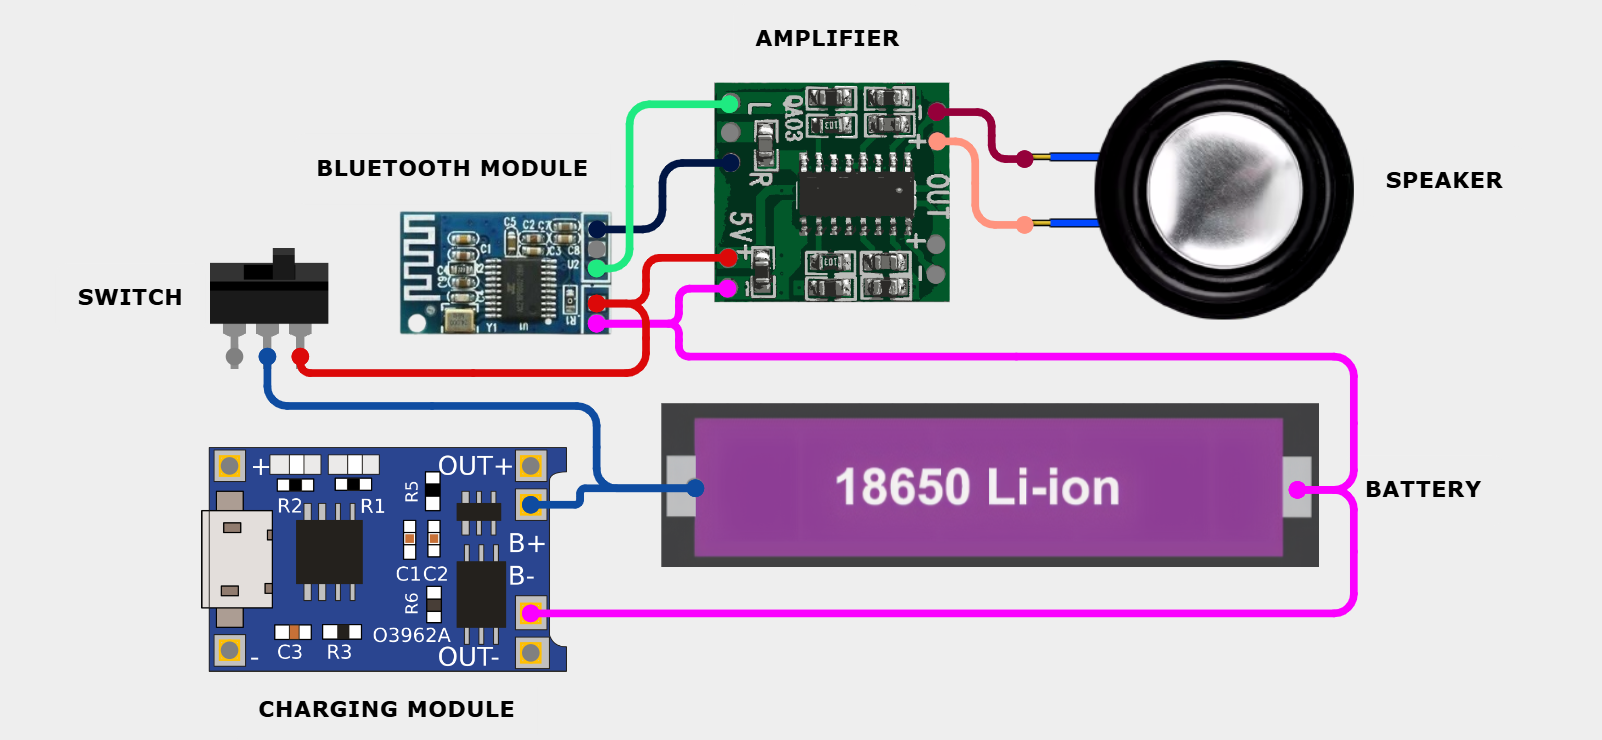
Circuit Description and Design
The circuit is designed by integrating two primary systems: the Power System and the Audio System.
1. The Power System (Powering the Device)
The goal is to provide a stable 3.7V-5V supply to both the amplifier and the Bluetooth module, using a rechargeable battery.
-
Battery & Charger: The 18650 battery (3.7V) is the heart of the power supply. Its + and - terminals are connected directly to the B+ and B- pads on the TP4056 charging module. This allows the battery to be safely charged via the module's Micro-USB port.
-
Main Output: The TP4056 module provides a protected output via its OUT+ and OUT- pads. This output is what will power the rest of the circuit.
-
Master Switch: To turn the device on and off, the SPST switch is connected in series with the OUT+ line. The OUT+ wire from the TP4056 goes to one pin of the switch, and the other pin of the switch becomes the main positive supply (let's call it VCC) for the entire project. The OUT- from the TP4056 is the main GND.
2. The Audio System (Getting Sound)
The goal is to get the audio signal from the Bluetooth module, make it louder, and send it to the speaker.
-
Bluetooth Module: This module receives the audio from your phone.
-
Power: It's powered by connecting its VCC (or 5V) pin to our switched VCC line and its GND pin to our main GND.
-
Signal: It outputs the audio signal via three pins: L (Left audio), R (Right audio), and AGND (Audio Ground).
-
-
Amplifier Module: The PAM8403 takes the weak signal from the Bluetooth module and makes it powerful enough for the speaker.
-
Power: It's also powered by the same VCC and GND lines.
-
Input: The audio signal from the Bluetooth module is fed into the amplifier:
-
Bluetooth L > PAM8403 L-IN
-
Bluetooth R > PAM8403 R-IN
-
Bluetooth AGND > PAM8403 GND (optional)
-
-
-
Speaker: The final step. The PAM8403 is stereo, so it has two outputs (Left and Right). Since we are using one speaker, we connect it to one of the channels.
-
Speaker + wire > PAM8403 R-OUT+
-
Speaker - wire > PAM8403 R-OUT-
(Note: Do not connect the R-OUT- and L-OUT- pins together, as this can damage the amplifier chip.)
-
Implementation and Results
Assembly
The project was assembled by following the circuit diagram. Each module (power, Bluetooth, amplifier) was connected using minimal-length wires, and all connections were carefully soldered to ensure a solid electrical bond.
Final Result and Testing
The project was a complete success. On flipping the power switch, the Bluetooth module powered on and became discoverable on a smartphone with the device name "CA-6953 v1.3". It paired without issue, and upon playing media, the audio streamed clearly through the speaker.
An initial buzzing sound, common in such DIY audio projects, was successfully troubleshoot. This was resolved by:
- Ensuring the 18650 battery was fully charged.
- Shortening all connecting wires to reduce interference.
- Re-checking all solder joints for a secure connection.
While the final prototype may look clumsy without an enclosure, it is fully functional and works exactly as designed, which is a fantastic result for a first build.
Media Gallery

Comments